How to Make Perler Bead Patterns: Grid, Image Converter, and Iron Settings
Updated August 2026 · ~14 min
Quick Summary
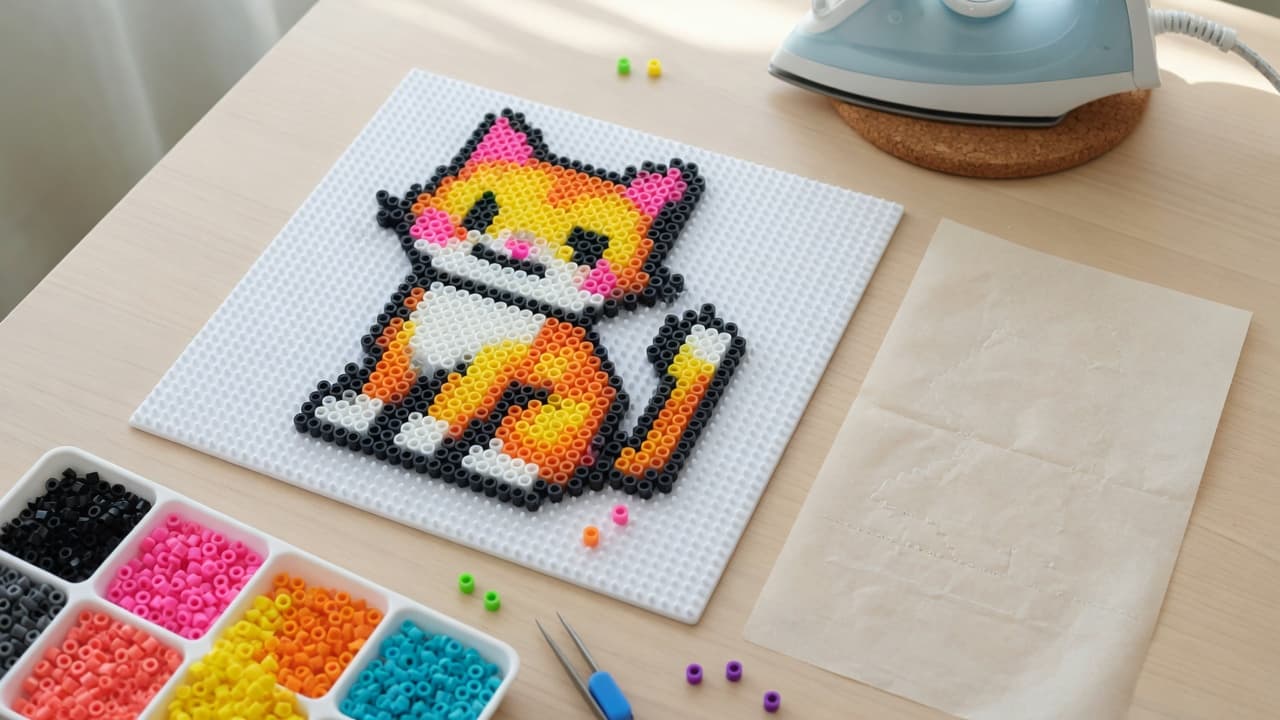
How to make perler bead patterns is mostly three jobs: design or convert a chart, place beads on a perler bead grid, then fuse them with the right heat. You can draw by hand or run an image to perler beads workflow with a free perler bead image converter. This guide covers grid sizing, popular themes (cats, animals, trees, and fan-art style subjects), iron temperature for perler beads, and what people mean when they ask for the best iron for perler beads.
Why this matters
Search mixes tool questions and craft questions. Some people only need a perler bead image converter. Others ask what iron setting for perler beads, iron temp for perler beads, or how to make a perler from an empty pegboard. Character queries such as hello kitty beads pattern or super mario perler bead patterns sit next to practical ones about heat and grid size. One clear path helps: plan the grid, choose a chart method, place beads, fuse safely.
Character names in this article are examples of popular search themes. Official brand artwork is usually protected. Use licensed kits, public-domain art, or your own drawings when you plan to publish or sell.
Key takeaways
- A perler bead grid is the pegboard (or digital chart) that maps one cell to one bead.
- How to make perler bead patterns can mean hand charts or image to perler beads with a converter.
- Cap colors near what you own; screen colors are a plan, not a match guarantee.
- Perler’s published guidance starts with a medium, dry household iron—not steam—and short passes with parchment or ironing paper; every iron differs, so test and adjust.
- The best iron for perler beads is usually a dry iron with stable medium heat, not a specialty gadget.
- Cats, animals, trees, and round medallions work well when silhouettes stay simple.
What you need before you start
Materials: fuse beads (Perler-brand or compatible midi-size), pegboard(s), optional tweezers, ironing paper or parchment, a household iron that can run dry, and a heat-safe flat surface.
Plan: a chart with colors you can buy, a bead count list for larger projects, and adult supervision whenever heat is involved. You can skip fusing for temporary display; most take-home pieces still need heat.
How to make a perler: the basic loop
How to make a perler project is the same loop whether the chart is a perler bead cat pattern or a holiday perler bead tree:
- Choose size and board shape.
- Get a pattern (hand-drawn, printed, or converted).
- Place beads cell by cell.
- Cover with ironing paper and fuse.
- Cool flat, then lift from the board.
Work in good light. Sort high-use colors into small dishes. For multi-board scenes, finish and fuse one board before starting the next if you need a flat storage surface.
Perler bead grid: size, shape, and what one cell means
A perler bead grid is both the physical pegboard and the digital grid you design on. One peg ≈ one bead. Larger long-edge sizes show more detail and cost more beads, time, and ironing patience.
| Goal | Grid approach |
|---|---|
| First test | Small square board, simple 2–4 color icon |
| Character head / emoji style | Medium long edge; tight crop on the face |
| Scene or multi-sprite panel | Multiple boards or a large board; plan seams |
| Round medallion | Circle board or square chart cropped to a disk silhouette |
For a make picture into bead pattern free for medallion workflow, crop the subject into a circle (or leave a circular outline of empty pegs), limit colors, and keep outlines thick enough that they survive low resolution. Thin line art often disappears on a coarse grid.
Grid guides every 5 or 10 cells help on large perler beads animal patterns. Detail does not scale linearly—doubling the long edge can more than double bead count.
How to make perler bead patterns from a photo (image converter)
How to make perler bead patterns from photos means reducing an image to a limited palette on a bead-sized grid. A perler bead image converter (also called a pattern maker or generator) does that mapping for you. The useful output is a build plan: grid, codes, and counts—not a finished plastic plaque.
What a good converter should give you
- A bead-sized grid matching a board size you own
- Brand or chart codes you can shop for
- A count list so you do not under-buy high-use colors
- Crop, max-color, and background tools so the subject stays readable
Privacy matters when the source is a family photo. Prefer tools that process the image on your device when that option exists.
Bead Pixel Art is a free browser perler bead image converter: mapping runs on your device, several brand palettes are available, and you can export a PNG chart plus a material list without an account. It is not affiliated with Perler Brands or other bead makers unless the site says otherwise. On-screen colors are planning values—check plastic under real light before bulk orders. See privacy and terms.
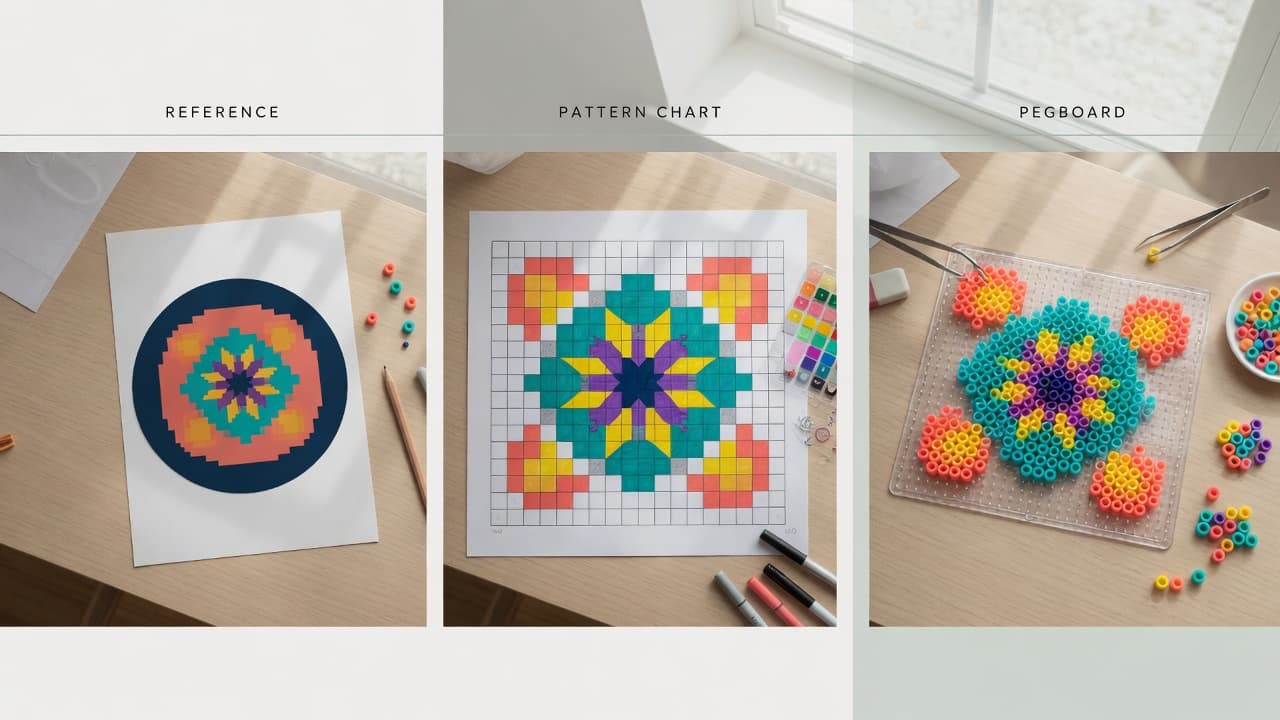
Image to perler beads: short steps
- Open the free editor.
- Add a clear photo (subject large in the frame, simple background).
- Set long-edge bead count; start modest, then increase only if needed.
- Pick a palette close to the beads you own; set a max-color cap.
- Crop tightly, clear noisy background cells, fix critical pixels.
- Export the chart and count list; verify top colors against inventory.
For tool selection, see Free Perler bead pattern maker. For a longer photo case study, see Photo to bead pattern.
Popular pattern themes: cats, animals, trees, and fan-art searches
Treat theme names as subject ideas, not free commercial licenses.
Perler bead cat pattern
A perler bead cat pattern works well because ears, eyes, and body blocks read at low resolution. Start with two to six colors. Whiskers are usually too thin for small grids—imply them with cheek shape.
Perler beads animal patterns
Perler beads animal patterns share one rule: bold shapes beat fur detail. If a converter fills the body with dozens of near-colors, lower the color cap until shapes stay solid at arm’s length.
Perler bead tree
A perler bead tree is a good seasonal or beginner motif—trunk, canopy blocks, optional snow or ornaments. Geometric trees iron more evenly than thin branch line art.
Hello Kitty beads pattern and Super Mario perler bead patterns
Searches for hello kitty beads pattern and super mario perler bead patterns are common because the originals are pixel-friendly. That does not make unofficial charts free to sell. Prefer official kits, permissioned assets, or original designs.
Iron temperature for perler beads: settings that stay honest
Questions about iron temperature for perler beads, iron temp for perler beads, and what iron setting for perler beads usually want one number. Household irons do not share one universal dial.
Perler’s published guidance (FAQ and standard fusing method materials) recommends starting with a medium setting on a dry household iron—do not use steam—and fusing with parchment or ironing paper. Their standard fusing write-up describes heat on the order of about 10–20 seconds per side, with adjustment because every iron behaves differently. Always recheck the instructions that ship with your beads.
Practical fusing steps
- Keep the layout on a heat-safe, flat surface.
- Cover completely with ironing paper or parchment.
- Set the iron to medium, steam off.
- Move in short, even passes; lift the paper to check melt, then continue if needed.
- Optional second side after cooling guidance from your method.
- Cool flat, then remove from the board.
Best iron for perler beads
The best iron for perler beads is rarely a craft-only model. Look for dry mode, a flat soleplate, a stable medium setting, and enough size to cover small boards. A high-end steam iron is a poor default if you cannot fully disable steam.
Peyote color vs Perler charts (quick disambiguation)
Peyote color searches usually belong to peyote stitch bead weaving (seed beads, Delica-style palettes), not fuse-bead pegboards. A peyote graph and a Perler chart can both use color codes, but the stitch structure and tools differ. If you want fuse beads, stay on pegboard charts.
Hand-drawn charts, placement, and finishing
For geometric icons or a simple tree, graph paper can be faster than a photo pipeline: board first, colors second. When mixing hand charts with image to perler beads exports, keep one code system per session.
- Build from the center or a landmark feature so miscounts stay local.
- Photograph the finished unfused board before ironing as a backup reference.
- Store open bags by code so the next chart reuses the same inventory language.
For children, prioritize large shapes, few colors, and adult-only ironing. Match difficulty to attention span and bead-sorting patience.
Common mistakes
- Unlimited colors on a photo → noisy board
- Huge grid for a first project → unfinished boards
- Trusting monitor color for bulk buys
- Steam on the iron or no paper barrier
- Using protected character art commercially without a license
FAQ
What iron setting for perler beads should I start with?
Start with the medium setting on a dry iron, parchment or ironing paper on top, and short passes. Adjust for your iron and bead brand. Prefer the manufacturer’s current instructions over a single shared temperature number.
Can I use any photo for image to perler beads?
Many converters accept common image files. Practically, clear subjects and simple backgrounds convert better. Respect privacy and copyright.
Is there a free way to make a picture into a bead pattern for a medallion?
Yes: use a free browser converter, crop to a circular subject, limit colors, and export a chart for a circle or small square board.
Do I need the best iron for perler beads to get a good melt?
No. Stable dry medium heat and correct paper technique matter more than a premium iron. Test on a small scrap first.
Are Super Mario or Hello Kitty charts free to sell?
Usually not, unless you use officially licensed products or have permission. Search popularity is not a license.
How is a perler bead grid different from a printed coloring page?
A grid maps to physical pegs and bead diameters. Design or convert at the bead count you will actually place.
Conclusion
How to make perler bead patterns comes down to a readable perler bead grid, a chart you trust (hand-made or from a perler bead image converter), careful placement, and sensible heat for fusing. Keep color counts honest and iron settings medium, dry, and short until you know your tools.